Forms & Popups

How to set up Google Tag Manager event Tracking for Greyd.Forms

This article explains, how you can track form events from your Greyd.Forms forms in Google Analytics using the Google Tag Manager.

Step 1: Create variables

The variables ensure that a Greyd form is recognized on a page and that the form CSS ID, form post ID and form name are read out. The form CSS ID is used to recognize the correct form in the DOM, the other two to pass on the form recognition data to Google Analytics.

  • This is done using the CSS selectors:
  • “form.greyd_form” → id (form CSS ID)
  • “form.greyd_form” → data-id (form post ID)
  • “form.greyd_form” → data-title (form name)

Go to "Variables" and create 3 new variables:

Screenshot of GTM variables configuration

Screenshot of GTM variables configuration

Screenshot of GTM variables configuration

Step 2: Configure triggers

Go to "Triggers" and configure at least the first one:

  • GA4 Form Trigger

    The first trigger ensures that the GA4 Form Submission tag is called when the event with the name “greydFormSubmission” is recognized.

Screenshot of GTM trigger configuration

  • Exclude WordPress Backend

    The second trigger is optional. It ensures that a page view is always prevented from being tracked in the WordPress backend. Depending on how the Tag Manager script was integrated, this can be important.

Screenshot of GTM trigger configuration

Step 3: Configure Tags

Go to "Tags" and configure the following tags:

  • GreydFormSubmission Script

This tag plays a script that checks whether a form is submitted. After the form has been submitted, the “greydFormSubmission” event is triggered and the “GA4 Form Trigger” is activated. This also writes the data layer variables on the form page.
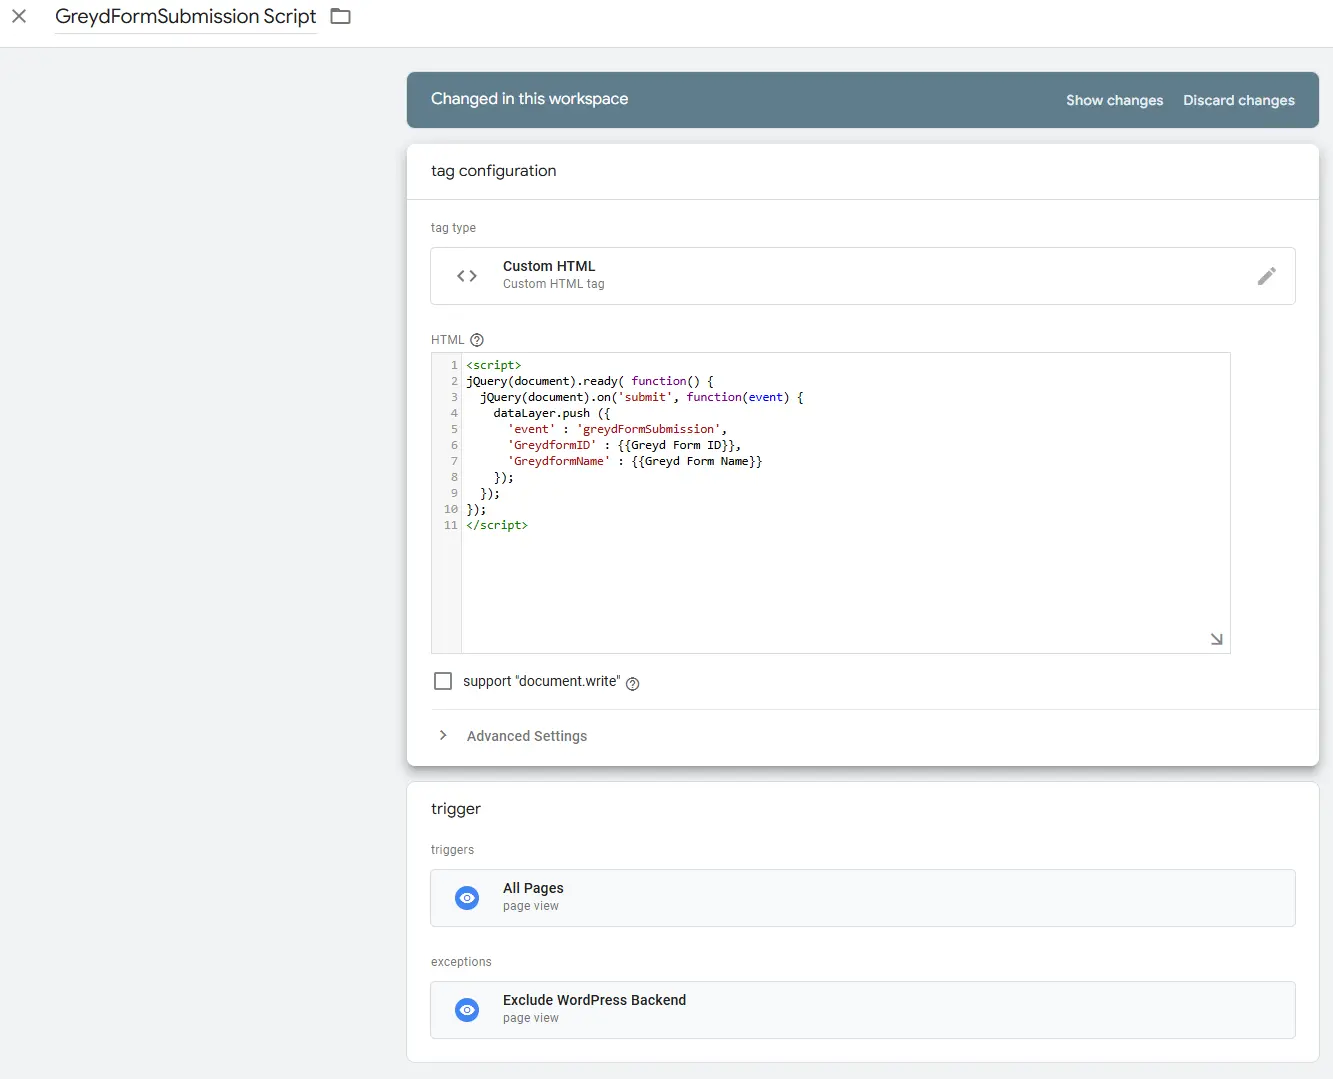
Screenshot of GTM tag configuration

<script> jQuery(document).ready( function() { jQuery(document).on('submit', function(event) { dataLayer.push ({ 'event' : 'greydFormSubmission', 'GreydformID' : {{Greyd Form ID}}, 'GreydformName' : {{Greyd Form Name}} }); }); }); </script>

  • GA4 Form Submission

This tag contains the measurement ID of the Google Analytics account and defines the data that is transferred to the Google Analytics account. It is triggered by the “GA4 Form Trigger” trigger.

Screenshot of GTM tag configuration

  • If you have already created your GA4 property in Google Analytics and generated a data stream, you can copy the measurement ID for the GA4 configuration tag here.

Screenshot of GTM data streems dashboard

Step 4: Check data in Google Analytics

Once you have set this up, you can now call up a form for testing, fill and submit it. It may take a few seconds for the data to appear in the real-time report. If a caching plugin is installed on the page, we recommend to delete the cache first.

Screenshot of GTM real time report with a successful form tracking

After 24 hours you will also find the data in the Engagement report:

Screenshot of GTM engagement report with a successful form tracking

Please note: For the form tracking in Google Tag Manager to work, there cannot be more than one form on a page.

This is a container export of the GTM settings.

You can upload it to your Google Tag Manager and replace the anonymous mess-ID with yours. Please note: Use the merge mode if you already have a configuration in your account that you want to keep. Otherwise the upload will overwrite it.

Ähnliche Artikel & Tutorials

Hinweis: Die Hilfsartikel stehen derzeit nur auf Englisch zur Verfügung.

How to set up Google Tag Manager event Tracking for Greyd.Forms

This article explains, how you can track form events from your Greyd.Forms forms in Google Analytics using the Google Tag Manager. Step 1: Create variables The variables ensure that a Greyd form is recognized on a page and that the form CSS ID, form post ID and form name are read out. The form CSS […]


Forms & Popups

How to create custom actions in globally connected forms

Greyd.Suite enables you to synchronize posts across several websites with Global Content. However, you can customize specific meta fields — like a forms admin mail_to field — locally for individual posts without disrupting global synchronization.How it works With a simple code snippet added to your child theme's functions.php you can:enable local editing of any meta […]


Forms & Popups, General Questions, Website management

Where do I find the form ID?

To use the form ID for example in the Conditional Content Block, simply open the corresponding form. You will now find the form ID at the top in the URL, e.g. "post=17967"


Forms & Popups

Is it possible to have conditional follow-up actions in forms?

Imagine a contact form on a corporate website that triggers an admin notification to different departments (e.g. HR, marketing, sales) depending on the user's entries? Or a lead form with different product categories that automatically notifies the responsible sales employee? This is actually possible with Greyd.Forms. Here's how: As an example we are going to […]


Forms & Popups

What do I do when there is an error message in the forms backend?

GREYD.Forms informs you in various ways should anything go wrong with a form – e.g. if an interface is not working as it is supposed to or if an email could not be sent. You will see the respective error message in the form entry and – depending from your settings – also as an […]


Forms & Popups

How can I reset forms statistics?

While there is not yet a native option to reset forms statistics, it is still very easy to reset them manually with GREYD.Hub:Open the database tab and search for the tables of the respective website. You should find a table calledwp_greyd_forms_interactions or similar.Select it, scroll down and click on "delete table". Your form stats should then […]


Forms & Popups

How do I create a form that only allows a certain number of submissions?

With the following code snippet you can easily use GREYD.Forms to create a form that only allows a limited number of form submissions and displays a corresponding info message. Please be aware of the comments in the snippet as the code needs to be adapted individually.if ( ! defined( 'COUNTER_FORM_ID' ) ) { /** * […]


Forms & Popups

An error message appears when submitting a form in the frontend.

If an error message appears on the frontend when filling out a form, you may receive an admin notification that the validation of a WordPress NONCE failed.NONCE is a WordPress security token that is also integrated into GREYD.Forms. NONCEs are used to protect against abuse and malware. If you receive such a notification, it means […]


Forms & Popups

Forms & Popups

Wie erstelle ich Quizz & Live-Umfragen?

In diesem Video zeigen wir dir, wie du mit Greyd.Forms interaktive Gamification-Elemente in deine Formulare einbinden kannst, etwa für Umfragen mit Live-Feedback oder ein Quizz.

Forms & Popups

Welche generellen Einstellungen in Greyd.Forms gibt es?

Erfahre, wie du einen zentralen Datenschutz-Text für deine Formulare einstellen kannst und wie du deine Formulare gegen Bots & Missbrauch schützen kannst. Das Video zeigt außerdem, wie du verhinderst, dass deine Formularmails im Spam-Ordner landen und wie du Schnittstellen aktivierst.

Forms & Popups

Welche Informationen finde ich im Backend zu meinen Formular-Einträgen?

Das Greyd.Forms Backend zeigt dir alle Formulareinträge inkl. Status übersichtlich auf. Dort kannst du auch Statistiken einsehen und deine Formulare so DSGVO-konform auswerten – ohne ein Analytics-Tool. Im Video zeigen wir dir außerdem, wie du Einträge automatisch löschen lassen kannst.

Forms & Popups

Wie gestalte ich Radio Buttons?

Ähnlich wie bei einer Checkbox kannst du mit Radio Buttons dem Nutzer verschiedene Optionen zur Auswahl anzeigen. Erfahre hier, wie du Radio Buttons in deine Formulare einbindest und gestaltest.

Forms & Popups

Wie erstelle ich intelligente Formulare mit Berechnungen?

Greyd.Forms ermöglicht es dir, mathematische Berechnungen in deine Formulare einzubinden und mithilfe von Schiebereglern interaktive Formulare zu gestalten. In diesem Tutorial erfährst du, wie einfach das funktioniert.

Forms & Popups

Wie setze ich Eingabefelder ein?

Eingabefelder kommen immer dann zum Einsatz, wenn der Nutzer etwas in ein Formular eintragen soll. Wie du Namens-, Adress- oder sonstige Eingabefelder gestaltest und welche Optionen dir dabei zur Verfügung stehen, zeigen wir dir kurz und knapp in diesem Video.

Forms & Popups

Wie gestalte ich Upload-Felder?

Du möchtest, dass der Nutzer eine Datei in deinem Formular hochlädt? Kein Problem! Erfahre hier, welche Möglichkeiten dir Greyd.Forms zur einfachen Einbindung von Upload-Feldern bietet.

Forms & Popups

Wie gestalte ich Dropdown-Felder?

Mit einem Dropdown-Feld kannst du dem Nutzer eine Auswahl verschiedener Optionen in einer Liste zur Verfügung stellen. Welche Einstellungsoptionen du in Greyd.Forms dabei hast, zeigen wir dir in diesem Video.

Forms & Popups

Wie gestalte ich eine Checkbox?

Eine Checkbox kannst du zum Anhaken von AGB, Datenschutz und Co. verwenden. Auch wenn der Nutzer verschiedene Optionen auswählen soll, sind Checkboxen besonders praktisch. Unser Checkbox-Tutorial zeigt dir alles Wissenswerte rund um den Checkbox Block in Greyd.Forms.

Forms & Popups

Wie erstelle ich ein Formular?

In diesem Video zeigen wir dir, mit welchen Blöcken du ein einfaches Kontaktformular erstellst. Außerdem erfährst du, wie du E-Mail Benachrichtigungen einrichtest und dein Formular mit der integrierten Double Opt-in Funktion datenschutzrechtlich sicherst.

Forms & Popups

Wie kann ich Felder voneinander abhängig machen?

Der Block 'Bedingter Container' ermöglicht dir, Felder in Abhängigkeit zueinander zu gestalten. Definiere, welche unterschiedlichen Felder sich öffnen sollen, wenn der Nutzer Option A oder B wählt. Lege fest, ob Fragen bei bestimmten Angaben übersprungen werden sollen. Wie du diese und viele weitere Abhängigkeiten ganz einfach einstellen kannst, erfährst du hier.

Forms & Popups

Wie arbeite ich mit Bildkacheln?

Bildkacheln sind eine tolle Möglichkeit, um dein Formular optisch besonders ansprechend zu gestalten und so die Conversion deiner Formulare zu steigern. Statt einfacher Auswahlfelder bietest du dem Nutzer schöne Bildmodule zum Anklicken. Dieses Tutorial-Video zeigt dir die umfangreichen und dennoch einfachen Optionen im Bildkachel Block.